1) Installation Guide for Oracle SOA Suite 11g Release
2) Fusion Middleware Adminitrator Guide
3) Fusion Middleware Installation planning Guide
The steps below provide a snapshot of what is required to be done -
1. Install DB 11g or atleast 10.2.0.4.0+
2. Run the RCU downloaded from
3. Install Weblogic server and create middleware home
4. Install JavaAccessBridge, before that understand if it is required in your scenario. it is only required for windows.
5. Install SOA Suite 11G
6. Configure the Weblogic Server and SOA/BAM Server.
7. Run the servers and check the consoles for various required applicaitons.
Ensure that you have read the PREREQUISITES as specified in Installation Document, we would be creating the install on Windows 2003 Server 32-bit.
Oracle DB 11g Installtion
You would need to download the Oracle DB 11g from www.oracle.com\technology, the file is named win32_11gR1_database_1013.zip
We would need to perform Custom install for the purpose of SOA Suite, aswe have to specify character set to be used for this database.
1. Run the win32_11gR1_database_1013\database\setup.exe
2. Select the installation method as “Advanced Install”
 3. Select the installation type as “Enterprise Edition”
 4. Set the directory of install to E:\OracleDB
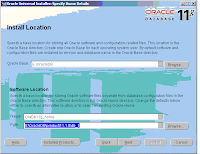 5. Now the installer checks the prerequisites
 6. Now Select Configuration option, suggested “Create Database”
7.For the database configuration option, select General Purpose Transaction processing option
8.Set the global database name.

9. Set the Character set, it is very important, lest you check AL32UTF8, you wouldnot be able to run the Repository Creation Utility for SOA Suite 11g. Also remember to keep the Enable Automatic Memory Management checked. This would save you from many unseen problems. 10. Since we do not need any email notification, lets keep it unchecked.
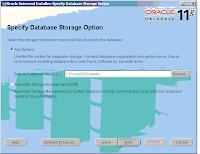
11. Specify Database Storage option, select “file System” and specify the directory to hold database content
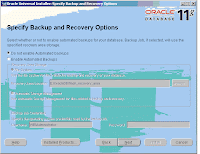
12. Select “Do not enable automatic backups”
14. We have used same password for all the users – “admin123” 
15. You may want to associate your metalink account here, but we shall leave it blank.
16. Check the summary once, and then click “INSTALL”
17. Once installed, it would ask you to set up the password for any accounts you want to unlock

18. We have unlocked scott and set the password as tiger 19. This ends the installation of Oracle Database 11g for SOA Suite.
Create Schema for SOA Suite and BAM using RCU
PreRequisite: Install Oracle 11G using AL32UTF8 character set, using Oracle Custom Install. The procedure is explained above.
Goto the \ofm_rcu_win32_11.1.1.1.0_disk1_1of1\rcuHome\BIN in the command window and run the batch file,
Rcu.bat
Click Next on the welcome screen
On the Create Repository Screen select “CREATE”
On the following screen provide the Database connection details
The service name is “orcl11g”
 This would begin prerequisite check
Select the following components which are REQUIRED for SOA Suite Install.Remeber that we have specified the “DEV” prefix for the schemas to be created. You may change it in the top dialogue box, this would help you to create your schema names as- Metadata Services – DEV_MDS
SOA Infrastructure – DEV_SOAINFRA
Business Activity Monitoring – DEV_ORABAM
User Messaging Service – DEV_ORASDPM
It would now check the pre-requisites again.
Next it would ask for passwords for different schemas, you may also choose to give same passwords for all schemas, which is a good decision for Development environment.
We have used admin123 as the password
 Note:You must remember or make a note of the password(s) from this screen; you will need them later when you are configuring your products.
On the Map Tablespaces screen, simply click OK.


Now it will begin creating tablespaces

Observe the summary information and click “Create” to proceed.

The RCU would now be busy creating tablespaces for each schema
This completes our repository creation exercise.

1 comment:
This post gives you steps to install Oracle SOA suite 11g. All the steps are very simple so you can implement them. With this screenshot are also attached so that you can have reference for each step. I think this is the best way you can present it.
sap upgrade
Post a Comment