Scope of this post is limited to create a JAX-WS webservice and does not discuss JAX WS implementation as such.
You would require to download the binary and execute this jar as
java -jar JAXWS2.1.1_20070501.jar
This would create a directory called jaxws-ri, henceforth refered to as %JAXWS_HOME%.
Configuring Eclipse
In Eclipse right-click to create a new "Dynamic Web Project", lets name it JAXWSCalculator.Now right click "Java Resources:src" and create a new class, say, Calculator in package de.swapgmbh.service.calculate. Now provide the code below with annotations -
| package de.swapgmbh.service.calculate; import javax.jws.WebMethod; import javax.jws.WebService; @WebService public class Calculator { @WebMethod public int add(int expr1, int expr2) { System.out.println("Now adding " + expr1 + " and "+expr2); return expr1+expr2; } } |
Now we need to create wsgen tool to process the class and generate web service. The wsgen.bat file is located in %JAXWS_HOME%\bin directory.
From the menu select Run > External Tools > External Tools...
This would open up a new window wherein you need to configure the wsgen tool.
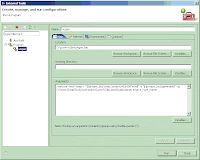
Provide the following details >
Name:wsgen
In the Main Tab>
Location:D:\jaxws-ri\bin\wsgen.bat  (%JAXWS_HOME%\bin\wsgen.bat)
Arguments:
-verbose -wsdl -keep -r "${project_loc}\WebContent\WEB-INF\wsdl" -d "${project_loc}\generated" -cp D:\Work\SwapStudy\workspace\JAXWSCalculator\build\classes ${java_type_name}
-r tells the wsgen where to keep the generated wsdl file.
-d tells the wsgen where to keep the generaed output files.
In the Environment Tab>
Create two variable
JAVA_HOME - C:\jdk1.5.04
JAXWS_HOME - D:\jaxws-ri
Now click Apply and Close.
Now in your project create "wsdl" folder in "WEB-INF" and a folder name "generated" on the root of your project.Â
Nowhighlight the Calculator class and Run the "wsgen". This would generate the wsdl and schema file in wsdl folder and other required classes in "generated" folder.
Now we need to modify the web.xml and create sun-jaxws.xml. Open the web.xml, and place the following details in.
| <web-app id="WebApp_ID" version="2.4" xmlns="http://java.sun.com/xml/ns/j2ee" xsi="http://www.w3.org/2001/XMLSchema-instance" schemalocation="http://java.sun.com/xml/ns/j2ee http://java.sun.com/xml/ns/j2ee/web-app_2_4.xsd"> <display-name>JAXWSCalculator</display-name> <listener> <listener-class>com.sun.xml.ws.transport.http.servlet.WSServletContextListener</listener-class> </listener> <servlet> <description>JAX-WS endpoint - calculator</description> <display-name>JAXWSCalculator</display-name> <servlet-name>calculator</servlet-name> <servlet-class>com.sun.xml.ws.transport.http.servlet.WSServlet</servlet-class> <load-on-startup>1</load-on-startup> </servlet> <servlet-mapping> <servlet-name>calculator</servlet-name> <url-pattern>/addnumbers</url-pattern> </servlet-mapping> </web-app> |
Now put in the following details in sun-jaxws.xml, which would be located in \WEB-INF folder, beside web.xml file.
<endpoints xmlns="http://java.sun.com/xml/ns/jax-ws/ri/runtime" version="2.0"> <endpoint name="calculator" implementation="de.swapgmbh.service.calculate.Calculator" pattern="/addnumbers"> |
Now, right click the project and click "Export >WAR File", place the war file at a preferred location.
Now copy the war file, place in webapps folder of your tomcat, and now you could access the wsdl file using "http://localhost:8080/JAXWSCalculator/addnumbers?wsdl"
You may want to use SOAP UI to access the service and see it working.

2 comments:
Very Nice & Helpful article. :)
I find the coding part in this post bit difficult. The article given in this post is very well written. You can try the program given in this post. If you got the logic behind this then please share it with us as I am unable to understand the logic behind it.
sap upgrade
Post a Comment