Friday, March 20, 2009

Problems faced during 10.1.3.4 SOA Suite Upgrade

Problem #1: Oracle BPEL Console does not show the contents of default domain.

Debug:
Observe the debug logs in %ORACLE_HOME%\opmn\logs\default_group~home~default_group~1.log

And the application logs located in 
%ORACLE_HOME%\j2ee\home\application-deployments\orabpel\home_default_group_1\application.log

Observation:
The following problem was observed:
Incorrect db schema version.
The database schema version "2.0.4" from the database does not match the version "10.1.3.4.0" expected by the server.
The database schema currently in place has probably been configured for a previous release; please re-install the database schema and try to start the server again.

Solution:
This means that the database schema was not upgraded to match the newer 10.1.3.4 version.

Execute the following scripts from your Installer directory
%SHIPHOME%\ias_windows_x86_101340\Disk1\install\soa_schema_upgrade\bpel\scripts
msql system/manager@jdbc:polite4@localhost:1531:orabpel @upgrade_10131_10134_olite.sql

%SHIPHOME%\ias_windows_x86_101340\Disk1\install\soa_schema_upgrade\esb\sql\other
msql system/any@jdbc:polite4@localhost:1531:oraesb @upgrade_10131_10134_olite.sql


Problem #2: Oracle Jdeveloper does not allow to deploy the Project, as it could not retrieve domain details.

Debugging:
Log on to enterprise manager console @ http://ics05-swapnils:8888/em/
Now go to Home > Applications, Inside applications, 
Expand All Applications > default > Middleware Services > BPEL > orabpel


Check the status of “deploy Service”.

Observation:
The service is STOPPED.

Solution:
Start the service and your JDeveloper should now be able to retrieve Domains, using right click on Project Name. 


Wednesday, March 4, 2009

WSIF Bindings

How to create a WSIF WSDL?

Add these two schema to your definitions tag
xmlns:format="http://schemas.xmlsoap.org/wsdl/formatbinding/"
xmlns:java="http://schemas.xmlsoap.org/wsdl/java/"


The format namespace adds support for mapping Java types to XML schema.
The java namespace allows mapping WSDL operation to Java methods.

Specify binding Information
<binding name="JavaBinding" type="tns:TestService">
<java:binding/>


Binding name specifies the name which would be reffered from service tag.
Binding type specifies the portType, specified in WSDL
The java:binding tag identifies that this is bound to Java code rather than a SOAP service.

This binding would encompass, formatting information, i.e. which XML tag is to be mapped to what Java DataType

<format:typeMapping encoding="Java" style="Java">

The format:typeMapping tag tells us that we will be mapping XML Schema types onto Java types.

<format:typeMap typeName="xsd:string" formatType="java.lang.String" />

The format:typeMap tag explains what Java type is to be used for each XML schema type in the interface.

The Service Tag refers to binding tag for mapping information.
The Java:address tag specifies fully qualified classname which contains implementations of operations specified inside binding tag.

<service name="TaskServiceService">
<port name="TaskServicePort" binding="tns:TaskServiceWSIFBinding">
<java:address className="oracle.bpel.services.workflow.task.impl.TaskServiceWSIF"/>
</port>
</service>

Tuesday, February 24, 2009

AQ Adapter for Complex Custom Objects

This post would concentrate on creating AQ for consuming custom message structures. The pre-requisites for creating a custom AQ is -

1) Oracle DB 10g – AQ queues are created at DB
2) Admin user credential with sysdba role to grant permission for 
normal user (e.g. scott) as in setup_user_grant.sql
3) user credentials for normal user (scott).

Step #1: Granting Permissions to Normal User

Connect tot he oracle DB "sys as sysdba" and run the following script

GRANT CONNECT, RESOURCE to scott;
GRANT EXECUTE ON SYS.DBMS_AQ to scott;
GRANT EXECUTE ON SYS.DBMS_AQADM to scott;
GRANT EXECUTE ON SYS.DBMS_AQIN to scott;
commit;

Step #2: Create Objects (Simple/Complex)

Now log out and re-connect as normal user (scott)

For simple objects like (Student:Roll_Num, Name, Age) run the following >>

create type STUDENT_TYPE as OBJECT (
  ROLL_NUM VARCHAR2(128),
  NAME VARCHAR2(512),
  AGE number
);

For a more complex scenario like >>

Vendor(ID,Name,Equipments (occurs multiple times),Feedback (occurs Multiple Times))

Equipment(ID,Description,Rate)

Feedback(ID,Description)

Create the Types as written below>>

create type Equipment_type is OBJECT
(
id NUMBER,
description VARCHAR(100),
rate NUMBER(10,2)
);

create type Equipment_Arr is VARRAY(50) of Equipment_type;

create type Feedback_type is OBJECT
(
id NUMBER,
description VARCHAR(100)
);

create type Feedback_Arr is VARRAY(50) of Feedback_type;

create type vendor is OBJECT
(
id NUMBER,
name VARCHAR(100),
Equipments Equipment_Arr,
feedback Feedback_Arr 
);

Step #3: Create and Start Queue

Here we need to create the table corresponding to object created above and link it with a queue and start the queue.

begin
  dbms_aqadm.create_queue_table('stud_in_table', 'student_type');  
  dbms_aqadm.create_queue('stud_in_queue', 'stud_in_table');
  dbms_aqadm.start_queue('stud_in_queue');

  dbms_aqadm.create_queue_table('stud_out_table', 'student_type');  
  dbms_aqadm.create_queue('stud_out_queue', 'stud_out_table');
  dbms_aqadm.start_queue('stud_out_queue');
end;


Here we created two queues- in-queue and out-queue, one for reading the contents and another one for writing contents in it. (In case of the complex scenario above, the queue table would be created only for vendor and not for equipment/feedback).

Once this procedure is completed successfully, this AQ can be utilized by BPEL AQ Adapter for enqueuing or dequeuing the object of interest.

The configuration of AQ is not covered in this post you may visit here for a step by step procedure for configuring the AQ Adapter in BPEL.


Tuesday, October 21, 2008

Securing B2B Integration Server Instance

Oracle B2B Integration Server Security

First step in the process is to create a Certificate Request. 

1. Open the Wallet Manager Application from Start-> Programs-> Oracle-oracleas-> Integrated Management Tools-> WalletManager.
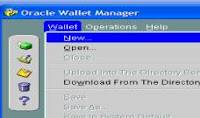
2. Now click Wallet-> New from the Menu bar in the WalletManager Application
 

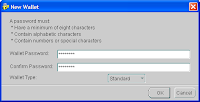
3. Provide a password for Wallet, say “admin123”


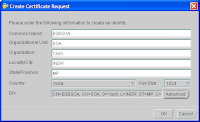
4. The application would prompt you if you want to create a certificate Request, now. Click Yes and provide the details in the box.
 

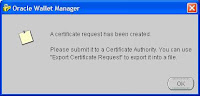
5. Once the certificate request is created, you need to submit this request to a Certificate Authority (CA).
 

6. Now select the Certificate:[Requested], which shows details of the certificate in the adjacent frame and click Operations-> Export Certificate Request, this would open a file browser, Select appropriate folder and save this request, with a file name “certificateRequestB2BSOA.cert”

 7. The above steps can be seen in the viewlet at the following location: http://www.oracle.com/technology/products/oid/oidhtml/sec_idm_training/html_masters/flash/ocasslsetuppart1_viewlet_swf.html


Repeat the above steps for the other B2B Integration Server as well.

 
Next Step is to get this Certificate Authorized from Oracle Certificate Authority. We need the OCA installed on one of the machines. Follow the steps below to process the certificate request.

8. Send the CertificateFile to the OCA machine.
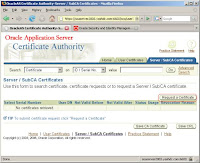
9. Now open the Oracle Certificate Authority User Page to submit the Certificate Request, by clicking the Server/SubCA Certificates>Request a Certificate


10. Now in the subsequent screen paste the contents of your certificate request, and do not forget to mention that the certificate would be used for Authentication, Encryption and Signing.


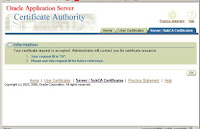
11. Note down the reference number provided on the subsequent screen this would be required in the admin console to approve the certificate.  


12. Now open the admin console using the admin url, https://localhost:/oca/admin, and jump to “Certificate Management”. Select the certificate of interest and click “View Details”


13. In the details page, the certificate can either be approved or rejected. Click the “Approve” button here. 
 

14. Take a note of sequence number generated in the subsequent screen.


15. Now go back to the https://localhost:/oca/user and click the Server/SubCA Certificates, now specify the sequence number noted above and click go.


16. Now check the desired row and click view details to check the certificate


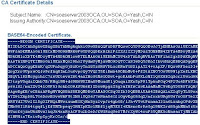
17. In the following screen, copy the certificate information including “Begin Certificate” and “End Certificate” from under the heading “BASE64-Encoded Certificate”


18. Paste the above information in a text editor, and save it under a comprehensive filename.
19. Now we need to follow the same step to get the issuing authority’s certificate. Under the “Server/SubCA Certificates, click the button, “Save CA Certificate”


20. On the following screen, click the “Advanced” button.


21. Now again copy the certificate information including “Begin Certificate” and “End Certificate” from under the heading “BASE64-Encoded Certificate”.


22. Paste the above information as well under a comprehensive file name and transfer these two files to the B2B Machine. 

Repeat the above steps for the trading partner’s B2B Server, as well.

 
Now the wallet, which was in “requested” state is to be brought in the “ready” state. For this open the Wallet Manager and follow the steps below.

23. Open the wallet, which was used to create certificate request, by selecting the wallet location and providing the password.
24. Now click “Import Trusted Certificate” and import the CA certificate file, created earlier.
25. Similarly, click the “Import User Certificate” and import the signed host certificate file. This would change the state of certificate from “requested” to “ready”.
26. Now for the host and trading partner to communicate, we would need to import the trading partner’s certificate in the wallet, as well, by clicking “Import Trusted Certificate”.
27. Now save the wallet, additionally also export the wallet to the same location to a file named “.txt” Preferably the location should not contain a directory name with spaces.


In this section, we would configure the Oracle B2B Integration Server for enabling SSL security. It is highly preferred that you have a running set up for atleast one collaboration instance, which is tested effectively to run in a non-secured http mode.

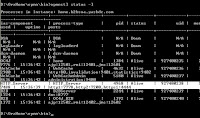
28. The first step is to check the https port number of opmn, use the command “opmnctl status -l” to check the port number. This port number would be used in step 34 to specify the https port. This is a very important step not every one gets default 443 as https port.

28. The first step, is to begin with creation of a secured Delivery Channel for the host trading partner. Select the “Trading Partners” under the “Partners” tab and click the host name.


29. Now click open the “Rosettanet over RNIF” under the capabilities tab.


30. In the following screen, open the “Create Communication Capability”


31. Now provide the details for creating the delivery channel, for the purpose of this document, the area of interest is only Transport security, the document doesnot focus on non-repudiation and encryption.


32. In the following screen, the existing Document Exchange settings could be reused, as shown in the figure below.


33. Now provide the details for transport, here we need to specify the HTTPS, as preferred transport protocol, SSL port as mentioned under the HTTP Server SSL Port as checked in Step #28, and use existing b2b/transportServlet as endpoint.


34. Save the current settings, by clicking apply.

 
Next we need to create the Secured Delivery channel for the trading partner, as well.


35. Select the “Trading Partners” under the “Partners” tab and click the name of trading partner, in this case (when GlobalChips is host), the trading partner is Acme. 


36. Open the “Rosettanet over RNIF” protocol under the Capabilities head.


37. In the following screen, open the “Create Communication Capability”. Now provide the details for creating the delivery channel, for the purpose of this document, the area of interest is only Transport security, the document doesnot focus on non-repudiation and encryption.


38. Reuse the existing Document Exchange, since we do not need any additional information here to enable security.


39. Provide appropriate details for the Transport settings, to enable security.


40. Click Apply and save the changes.

This step is to be performed similarly on the trading partner's system, as well.


The server is now required to be updated and specified the location of certificate. The steps below would elaborate on how the certificate be configured.

41. Now open the Enterprise Manager Console, http://b2bsoa.yashdc.com:18100/emd/console/ specify the ias_admin as user and its usual password “admin123”. Click open the B2B server by clicking the “B2B” link, on the home page.


42. Now open the “server properties” under the Administration tab of B2B Server Instance.


43. In the subsequent page, provide for the path of .txt file, where the wallet file imported in text format, as specified in previous step is located.


44. The above property is stored in, tip.properties file in \ip\config directory.
45. To enable SSL, it is required that the opmn.xml file be modified, open the \opmn\conf\opmn.xml, search for ssl-disabled and replace it with ssl-enabled 
46. Now restart the opmn, using opmnctl stopall/ opmnctl startall, for the changes to take effect.
47. Once both the B2B server instances, host & trading partner, have been configured and restarted, the following screens should be traverse-able from either systems,
https://b2bsoa.yashdc.com:4444/b2b/transportServlet and https://soab2b:4444/b2b/transportServlet
           

48. Now the respective certificate location is to be specified to the Trading partners, both Host and Remote Partner.

49. Open Partners->Trading Partner (Host) -> Certificates > Create


50. In the following screen provide the specified information. In this case the information provided is Name as “B2BSOACertificate” and the certificateFile as “C:\Certificates\issuedB2BSOACertificate.txt”, to stress further, it is not the wallet file, but the certificate file created in step no. 17 & 18.

 
51. Perform the above operation for Trading Partner (Remote Partner) as well. This ensures that the certificate is known during the inbound messages.

52. Now configure the agreement and set the configuration on both the systems and deploy.

53. Now restart the opmn, using opmnctl stopall/ opmnctl startall, for the changes to take effect and trigger the BPEL process to post appropriate document. 

54. Very Important Note: Whenever any change is made to Trading partner configuration, like Delivery Channel, Document Exchange, Transport etc. Be sure that you re-deploy your agreement for the changes to take effect.


Check the thread below for some of the errors that may occur.
http://forums.oracle.com/forums/thread.jspa?threadID=690847

Friday, October 3, 2008

Why this blog?

My first post on this blog comes out of blue. I am not sure who this blog would cater to, and what subject would it specialize in.I believeblog should represent a person and should not be restricted to a particular subject, it is  a personal opinion that instead of having multiple blogs (which I earlier had), it is more manageable to have a single blog and let the labels classify the kind of entry you have in you blog site. 

This blog would act as a stage for me, a dias, where I can stand and shout what I want without caring if someone intends to listen. This place would be special, which would hold my views and my opinions on different subject matters at that instance of time including but not limiting to, psychology, phillosophy, my hobbies, the technologies, my collection, my observations of differents facets of life, personal, professional or otherwise. In short it would reflect the inner me.

I believe I would be able to steal some time to place in some or the other thing at least once a week.